

Phase Four: Design
It’s finally time to design your recycling program! Be sure you are consulting with the buildings and grounds supervisor and staff throughout this phase. Their input is critical while designing your program.
At this stage, you should know which materials you plan to collect. You now need to determine how the materials will be collected. The most common collection methods currently in use are called:
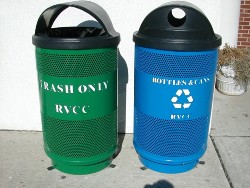
Dual-stream: a two-stream recycling system in which corrugated cardboard and other kinds of paper are kept separate from bottles and cans (glass, plastic, aluminum and steel cans)
or
Single-stream: a one-stream recycling system in which corrugated cardboard and other kinds of paper are mixed together with bottles and cans (glass, plastic, aluminum and steel cans)
Whether you collect material dual-stream vs single-stream, will primarily depend on the hauler and recycling facility. If you collect material single-stream, you will need fewer recycling containers inside the school, since there is only one recycling stream. With a dual-stream system, you will need to provide separate recycling containers for paper and others for bottles and cans.
Identify the types of containers you plan to use and where you plan to place them. Look through this slide show prepared by the MCMUA of containers placed throughout a school with a dual-stream recycling program.
In your walkthrough assessment from the previous step, you took inventory of the containers that you have and the locations where you need containers. This will provide you with the number of containers that you will need to purchase.
Container Categories
Containers can be divided into four categories:
Smaller containers usually provided by the school:
- Indoor containers for trash and recyclables.
 Outdoor containers for trash and recyclables.
- Containers, most likely on wheels, used to collect and transport the trash and recyclables from the containers in #1 and #2 above to the storage location.
Below, more information is provided for what to consider when you plan a purchase order for these smaller containers.
Larger containers usually provided by the hauler:
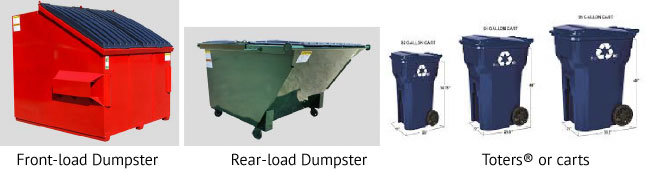
4. Larger containers or “dumpsters” designed to hold the materials from the containers in #3 above and that are often located outside. These containers or dumpsters are usually provided by the hauler and are included in the contract for hauling services. See images below. Dumpsters can be rear-loading or front-loading and vary in size from 2 to 10 cubic yards.
Haulers may also be able to provide service for Toters® or carts if they have “cart tippers” on their trucks. Toters® or carts are much smaller than dumpsters and usually are available in approximately 32-gallon, 64-gallon or 96 gallon-size.
Additionally, if there is a lot of material from a large school with limited space outside for dumpsters, a large compactor may be warranted. Compactors are expensive, so check with the hauler to see if they can provide one. The school will need to provide an electric connection and may need a concrete pad to mount the stationary unit and the large receiver box guide rails.
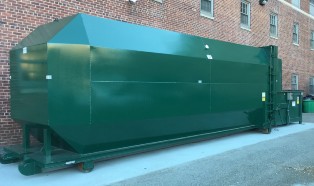
Compactor Receiver Box |
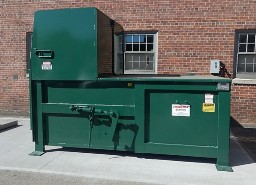 Stationary Compactor Unit |
Any Containers Available at No Cost or Via Grant?
- Contact your municipal recycling coordinator or county recycling coordinator to see if they offer free containers to schools.
- Check with your hauler to see if they provide any containers or dumpsters.
- Check with Sustainable Jersey for Schools “Grants” webpage for any available grants.
- Apply for the Coca-Cola/Keep America Beautiful Bin Grant Program for bottles and cans.
Shop for Containers
If you need to purchase containers, determine what funds are available in the budget for this expenditure. Contact your business administrator to obtain this information. Your business administrator may also be aware of purchasing co-operatives (“co-ops”). Buying containers through a co-op may limit your selection but can simplify the purchasing process and may save money. One co-op, Educational Services Commission of New Jersey (ESCNJ), a school-based purchasing co-op, had a recycling container contract available at the time this toolkit was updated in 2020. Your purchasing official will know best if any other co-ops are available for these containers.
Contact your municipal recycling coordinator or county recycling coordinator for assistance with finding the best containers for your school. They may have experience purchasing containers and may also have suggestions for types of containers that will be appropriate and hopefully affordable.
The MCMUA maintains a list of vendors who sell recycling containers. Browse through these websites to shop for containers for your school. While some of these sites listed do not have products for schools, most do, and some have a section specifically for schools.
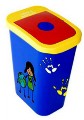
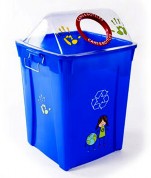
For example, the Fibrex Group and Recycle Away Systems & Solutions both offer a line of unique containers called Kidz collections featuring bright colors and artwork.
 |
 |
 |
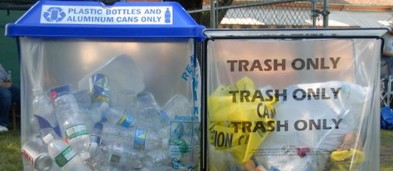
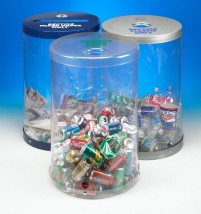 Clear containers allow the users to see exactly what is inside. In this photo, a product called Cannibles®, shows clean material in a clear container from Windsor Barrel Works (Kettle Creek Corp).
Keep in mind that metal containers, containers made from recycled lumber slats, and recycling clusters or stations tend to be expensive, so be sure to get pricing as you shop.
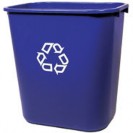 If you find that containers are expensive and your school’s budget doesn’t allow for all the containers that are needed, consider spreading your purchase out over multiple years and phasing in the containers over time. Instead of buying “fancy” or expensive container systems, consider products offered at Rubbermaid Commercial Products. The deskside recycling container comes in 3 sizes, 13-quart, 28-quart and 41-quart and is sold in packs of 12. They feature the imprint of the recycling symbol and are great for pairing next to trash containers in classrooms.
Make sure the containers throughout the school are compatible with the containers the buildings and grounds staff will use to collect the material at the end of the day.
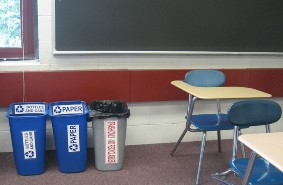
Put Recycling Containers next to Trash Containers
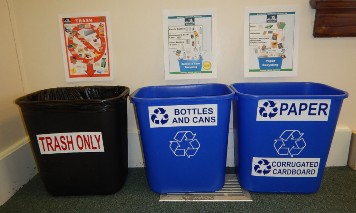
As displayed in the slide show linked above, when trash and recycling containers are placed next to each other, this makes it easier for everyone to recycle. Experience has shown that the cleanest recyclable material results when the same access is given to trash and recycling containers. For example, if a person holding an empty recyclable plastic bottle walks by a trash container and there is no recycling container next to it, it is likely that person will utilize the easier option and put the recyclable material into the trash container rather than walk any extra distance to find a recycling container. The same is true for an item of trash when a recycling container is the only option. Placing trash and recycling containers next to each other everywhere is critical. Remember to keep equal access to trash and recycling containers to avoid cross-contamination. Always place trash and recycling containers next to each other. Make sure the paired containers stay together. Over time, they have a tendency to “grow legs” and become separated.
 |
 |
Container Locations
Here is a suggested list of locations that will need a pair of recycling and trash containers:
- Anywhere there is currently a trash container, add a recycling container.
- Classrooms: Every classroom needs a recycling container next to the trash container.
- Photocopiers.
- Offices.
- Faculty rooms.
- Cafeterias: In addition to recycling and trash, consider using a separate watertight container to capture liquids. See the slide show above for an example of this. Liquids are heavy, so consider how best to drain that container.
- Kitchen prep areas, as well as eating areas.
- Auditorium/Gym.
- Library.
- Vending machines.
- Hallways: Consider placing paired hallway containers near water fountains, so bottles still containing liquid can be emptied before putting them into a recycling container.
- Locker rooms.
- Bus transportation building and garage.
- Buildings and grounds maintenance department.
- Outside areas. Be sure to include ball fields.
- Outdoor events for temporary uses.
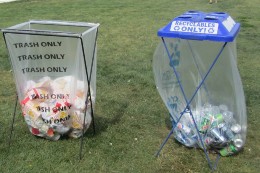 |
 |
These ClearStream containers can be located at outdoor events. When those events have concluded, the containers are removed from the event venues. Because of the presence of clear bags that are affixed to the metal frames, along with proper labels, they generally yield properly separated material.
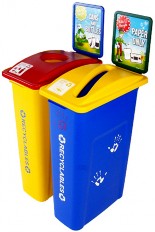
Color Themes
Using colors to indicate which stream goes in which containers can be helpful. Plan which colors your school will use for each material stream. For example, trash can have one color. Recycling can be a separate color. If you have a single-stream program, you may only need one color for recycling containers. If you have dual-stream program, you may need one color for paper and one color for bottles and cans. If you plan to add food waste diversion, now or in the future, you may want to consider a color for the food waste stream as well.
Container Labels and Signs
- Containers need to be clearly labeled on all sides, ideally with pictures and words. Remember to indicate acceptable and unacceptable materials. Consider whether your school needs labels in other languages in addition to English.
- Discuss with the buildings and grounds manager the use of plastic bags in the containers. If a plastic bag is pulled down over the outside of any containers, make sure to position the label so that bag doesn’t cover the label. Using a clear plastic bag instead of a black bag will allow the label to be seen.
 Some containers are sold with vertical signs sticking up at the back of the container. These work best to convey which container is for which material, but can add to the cost.
- Consider hanging a poster on the wall behind the trash, recycling, food waste, or liquid containers to designate what material should be put into each container. And do be careful that containers stay in the correct position.
- If you need to find or make labels and signs, here are some suggestions:
Contact your municipal recycling coordinator or county recycling coordinator to see if they offer free labels to schools.
The Recycling Partnership has free downloadable artwork available.
The ANJR webpage has links to free artwork.
Lids or No Lids
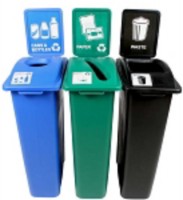 Consider if you will use lids on your trash and/or recycling containers. Vendors sell various types of lids with different restricted openings, depending on their use. Lids can be helpful because they provide a way to designate and differentiate between the material-specific containers. These lids on top of the containers convey the message better than a label on the side of the container does.
This Simple Sort Triple Recycling Station from Recycle Away Systems & Solutions, contains restrictive lids with words and images on the lids, as well as a vertical sign at the back of the container.
Keep in mind that lids can get dirty and may need to be washed occasionally.
- Identify staff who will be responsible for the collection of materials. Most likely it will be the buildings and grounds department.
- Find appropriate containers for collection of materials from throughout the building. These containers must be able to keep the trash separate from the recyclable material. They also need to be easily unloaded into the outside recycling dumpsters. This flyer contains tips for collecting materials throughout the building.
- Be aware that while trash is normally bagged and tossed into a dumpster, this is not the case for recyclables. Recyclables must be loose (not inside bags) in the recycling dumpster. Therefore, consideration must be given to how to unload the transportation containers.
- Educate staff members to ensure that recyclables are kept separate from trash during the collection process. This flyer shows photos of a collection that mixed separated trash and recyclables together.
- Provide labels/signage on/at outside containers/dumpsters to reinforce this message.
- Consider whether your school needs labels in other languages in addition to English for transport containers and for outdoor dumpsters.
- Consider using clear bags instead of opaque (black/green) bags. Opaque bags hide improper materials; i.e., trash in recycling or recyclables in trash. Clear bags for both trash and recycling collection will allow you to determine if materials are being properly sorted as you monitor your program without having to open bags. Remember, you must debag the recyclables when putting them into the dumpster. The empty bags should be placed in the trash dumpster or be reused, if clean.
- Ask the buildings and grounds manager if you need plastic bags for recyclables. You may not need plastic bags as liners for all of the recycling containers. The classroom containers may yield mostly clean dry paper.
Be sure to include special events and the use of buildings by non-school organizations in your plan.
Consider how to provide containers, collections, and education for the following types of special events:
- Extra corrugated cardboard boxes for new material deliveries, especially at the start of each new school year.
- Indoor sporting events, performances, other special events.
- Outdoor events.
- Locker cleanouts.
- Graduation.
- Outside organizations that use the building or the athletic fields.
How to test your containers and signs:
- Make one complete recycling and trash station. Put recycling and trash containers right next to each other.
- Provide several students and employees with a bag of acceptable and unacceptable items to sort. Watch for assumptions, questions, and difficulties they may have. Invite them to provide feedback.
- Make improvements based on the experience.
- Make final decisions about containers and signs.